Engbretson Underwater Photography

Search The Fish Photos


News From Behind the Scenes at Engbretson Underwater Photo and Stories about the Freshwater Environments We Visit.


Friday, May 25, 2012

Our Roster is Growing!

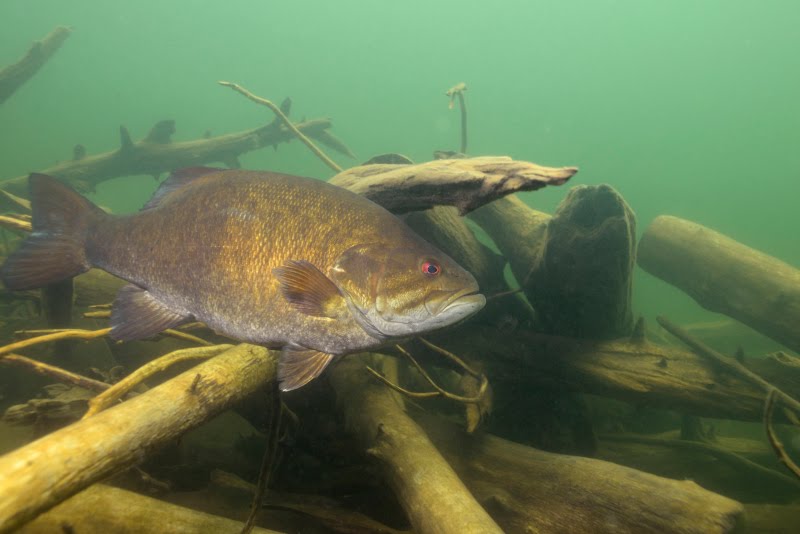
Longnose Gar-Buffalo River, Arkansas (c)Isaac Szabo/Engbretson Underwater Photography


Here at Engbretson Underwater Photography, we're quietly assembling what might be the greatest team of freshwater fish photographers in the country.  Our newest star to the team is Isaac Szabo from Arkansas.  Isaac takes exceptional underwater images from the many clear streams, rivers  and lakes of Arkansas and Missouri.  His photography of many of the colorful fish native to the Ozarks region is simply outstanding!  I'm really delighted to have Isaac on board as his images cover a unique niche and region in underwater photography.  You can see more of his images in the Isaac Szabo Gallery on my website.

Isaac joins Paul Vecsei, Roger Peterson and myself on the "dream team" here at Engbretson Underwater Photography

Tuesday, May 15, 2012

Beginners Guide To Underwater Photography in Your Own Backyard

Snorkeling a small, clear stream (c)Eric Engbretson
When you think of underwater photography, the image that readily comes to your mind is probably one of coral reefs on distant tropical islands. You may also think of complicated scuba diving equipment and expensive underwater cameras. While you marvel at the underwater photos in magazines like National Geographic, it seems impossible to imagine that you could ever take a truly stunning underwater picture yourself without all the training, equipment and travel that surely must be involved. But the fact is that taking great underwater pictures is a solid reality. And you can take these pictures in your own backyard with a minimum of equipment or investment. 

Underwater Pictures in my own backyard? At first you may think this sounds silly. “There aren’t any sharks, whales, sea turtles or coral reefs where I live. Where could I take underwater pictures?” While there may not even be an ocean within hundreds of miles of where you live, there is certainly water. Our humble little lakes, creeks and streams may not be as intriguing as the Mexican Riviera or Florida Keys, but they’re teeming with life just the same. In their own way, they’re remarkably exciting ecosystems worthy of exploration and photography. You just need a camera, some modest snorkeling equipment, and a few expert tips that will instantly give you outstanding results that will delight all your friends.

CAMERAS
Today’s digital cameras are highly sophisticated. No matter which one you own, you’ll be able to use it to take great underwater pictures. Some models are waterproof from 15 to 30 feet down. If yours is not, you’ll need to buy an underwater housing. Camera housings are basically watertight containers, usually made of acrylic plastic, that shield your camera from the water. Most of the camera’s features will function through a variety of controls on the housing itself. The price of housings varies widely, with the more expensive cameras generally requiring costlier housings. IKELITE of Indianapolis manufactures a wide variety of underwater housings for the most common digital cameras.

Since this is not an article on how to master your digital camera, I won’t spend any time describing which ISO, shutter speed or aperture to use. There are no special settings to use underwater in any event. If you become intimately familiar with your camera and learn its capabilities, you’ll be fine. If you can consistently get good pictures with your camera on land, you’ll be able to do the same when you take it under the surface.


SNORKELING EQUIPMENT

What you’ll need to get started are a mask, snorkel, and fins. If you don’t yet have snorkeling gear, you won’t need to spend a great deal. You can find adequate snorkeling equipment in most discount stores for just a few dollars. You’ll find better gear at dive shops. The important thing is to select comfortable fins that are the right size for your feet and a mask that comfortably fits your face. Nothing will impair your enjoyment of shooting underwater more than a leaky mask that forces you to surface repeatedly to remove water from inside. If your gear fits well, you’ll be free to concentrate on taking pictures of the wonderful things you see underwater. If you’ve never used snorkeling equipment, you might spend a little time at the local pool to become familiar with it before you head to the lake with your camera. Just remember that you need to be thoroughly comfortable with both your snorkeling gear and your camera. You don’t want to find yourself fumbling with either while you’re underwater.

UNDERWATER SUBJECTS

The underwater life you’re most likely to encounter in freshwater lakes and streams depends primarily on where you live and which species of life dwell in your area. Two of the most widespread fish that you’re likely to see first are sunfish and bass. Both species tend to be social, gregarious, and curious. You might also see turtles or crayfish, both of which make good subjects. Other fish you’re likely to encounter are schools of minnows. They can seem at first to be colorful and interesting, but don’t spend too much time with them. They’re too small and they usually move too fast. Trying to take good pictures of them can be an exercise in frustration. While it’s possible occasionally to encounter mammals, reptiles, amphibians or aquatic birds, most of what you will see while you’re snorkeling and photographing will be warm water freshwater fish. It may at first seem impossible to get truly good pictures of fish, but your chances will improve dramatically when you follow a few secret tips.

 FIVE SECRETS TO GREAT UNDERWATER FISH PICTURES

There are really only five tips beginners need to keep in mind to get consistently good underwater images. Follow these secret tips, and your friends and family will be amazed at the pictures you’ll be able to show them.


1) SHOOT ON SUNNY DAYS

The single biggest factor that will affect the quality of your images is light. Professional underwater photographers use powerful strobes that enable them to shoot in the depths on cloudy days or even at night, but external strobes can be expensive and difficult to master. As a beginner, you’re better served forgetting about strobe lights altogether and instead utilizing the best source of light there is: the sun. Shoot on bright, sunny, cloudless days between 10 a.m. and 2 p.m. This is when the most sunlight penetrates the water. Keep the sun at your back at all times and your subjects will be brightly illuminated and your pictures will be colorful and vibrant. If your camera has a built-in flash, turn it off for best results. After you’ve gained more practice, you can experiment with adding strobe or fill flash. Trying to balance strobe light and sunlight underwater on your first few outings will only lead to disappointment and frustration. Since you’re snorkeling and working in water that’s relatively shallow, there will be plenty of natural light on sunny days to allow good exposures without a flash.

2) SHOOT IN CLEAR WATER

Shoot in the clearest water you can find. Water is 800 times thicker than air, and even the clearest water contains particles that will diminish the quality of your images. If you compound this problem with natural stains, algae, suspended debris, or runoff that’s often found in our waterways, it’s like trying to take terrestrial pictures on a snowy, rainy, or foggy day. Clarity is of critical importance. Having the best camera and the best light won’t make any difference if the water itself isn’t clear enough for your pictures.
Simply put, without excellent clarity great underwater pictures are impossible to shoot. Unless you live in a very large city, chances are that you’ll find at least a few small lakes or streams within driving distance where the water is still crystal clear. Rivers tend to be turbid, but smaller creeks and streams that feed larger rivers can often be sources of very clear water. To help locate clear water, consult your local Department of Natural Resources. They’re often a good resource for this information. Local dive shops can also tell you about the clarity of nearby lakes. Fishermen and women can be another source of reliable information on clarity in local bodies of water. Water clarity in lakes and streams can vary widely depending on time of year and amount of rainfall or disturbance. Usually, lakes and streams are clearest in the spring and late fall. Avoid them after heavy rains or after excessive recreational boating and other disturbing activities. When viewing water from the shoreline, keep in mind that water will always seem to be clearer than it actually is. In the beginning, you’ll often change your opinion about water that looks clear after you put on a mask and view it from under the surface. After a little practice, you’ll be able to determine if the clarity is suitable just by standing on the bank and looking into the water. If it looks “OK,” it’s probably terrible. If it looks like the clearest water you’ve ever seen, it’s probably merely “good enough.”

 3) FINDING FISH

Once you’re in the water with your camera and are satisfied with the level of clarity and sunlight, it’s time to look for some fish. In lakes, concentrate on areas near the shore in water two to five feet deep. This so-called “littoral zone,” where land and water merge, is a lake’s most ecologically rich area. Fish seek out these shallow areas most of the year when searching for food, cover, and nesting areas. The littoral zone teems with life. Young fish grow up in these shallow areas because they find protection from predators. Larger fish will move through here because the smaller fish represent a rich source of food. Resist the urge to explore deeper water farther away from the shore. Most of the year, you’ll find that fish and other underwater life relate best to the shallows near shore, especially in the spring when the water first warms. In lakes, look for fish in areas of dense underwater plants or around bulrushes and under lily pads, too. Additionally, any trees that have fallen into the water will usually hold fish, with larger trees attracting more and larger fish. You may also see fish under docks, but because they’re going to be shaded from the sun, and therefore not properly lit, they don’t make good photographic subjects on your initial explorations.

 In streams, look behind large rocks or boulders and in pools outside the main current. Fish often congregate here. Fish use anything that provides shelter or cover, so stay on the lookout for these elements. Only rarely do fish congregate along clear sandy shorelines devoid of plants, rocks, or submerged woody cover.


4) GET CLOSE

The number one mistake that novice underwater photographers make is failing to get close enough to their subjects. Since freshwater fish are relatively small, you have to get extremely close to them for striking, frame-filling pictures. On the other hand, this isn’t as difficult as it may seem. Once you see a fish, you need to make a quick assessment of its potential for your photographs. If it’s swimming away, let it go. Swimming after a fish is futile and results only in pictures of tails, not the stunning full-body portraits that you’re really trying to make. You’ll want instead to concentrate on fish that are not in motion. These are the easiest fish to photograph. Once you see a fish nearby, the first thing to do is to freeze and let the fish come to you. If you remain motionless and quiet, many fish are curious enough to swim right up to you for further investigation. Any sudden movements will cause them to swim away quickly. Remain still and allow the fish to become accustomed to your presence. After a few minutes, if the fish doesn’t approach you, and it doesn’t swim off, move in closer. Do this slowly and only a few inches at a time, pausing with each new advance. Always try to approach fish mainly from the front. Let the fish see you. Because this approach is an unnatural tactic for a predator, the fish will more likely regard you as non-threatening if you behave like this in a slow and deliberate manner. As you move in closer and closer, stop to take a few pictures. Continue to move closer while carefully watching the fish. At some point, you will go beyond the fish’s zone of acceptable comfort. This is when the fish will retreat because you’ve gotten too close. But if you move slowly, studying the fish as you approach, you’ll see the early signs from the fish that you’re getting too near. It may begin to get nervous, to turn, or move slowly away. This is where you stop. This is as close as you’re going to get to this particular fish at this time. This is where you take your close-up pictures. If you’re doing it right, you should be only one to three feet away. Your pictures at this distance will be amazing, especially in very clear water on a bright sunny day! It’s important to keep in mind that fish vary from lake to lake and species to species. Don’t be disappointed if you don’t get near enough for that breath- taking close-up every time you shoot. There will be other opportunities. With time and patience, you’ll enhance your skills at this method. With experience, you’ll get within arm’s length of most fish most of the time.
 

5) BE PATIENT, GO SLOW, BUT SHOOT A LOT
Concentrate on a small area. Resist the urge to explore the entire lake in one day. Once you’re found a location that’s holding fish, stay right there. Focus on an area about the size of your living room. Let the fish in this zone get accustomed to your presence. Be still or move very slowly as you explore the area. Be especially careful not to disturb the bottom. Any dirt or debris stirred up will impair your pictures. If you do cloud the water, wait for it to clear. Too often, we’re in too much hurry. Watch and wait. Take your time. Stay still and just observe. When you do, you’ll unveil the magnificence of our lakes.

 Finally, don’t be timid. Today’s cameras make it incredibly easy to take a great many pictures on one shoot. Professional underwater photographers routinely shoot hundreds of images just to get the half-dozen great shots that deserve publication.

Many of us have had the chance to snorkel while vacationing in warm tropical oceans, but you don’t need to travel half-way around the world to enjoy underwater life. We all have exciting opportunities in our own back yards to view native fish in freshwater lakes and streams. These worlds go largely ignored by people who show them too little appreciation or simple understanding. But if you take the time to go under the surface of your own backyard lakes, you’ll find them fully as vibrant and fascinating as any coral reef in the Caribbean or other exotic location.

Tuesday, May 1, 2012

The Mystery of Catfish in Trees


A flathead catfish balanced on a tree limb. (c)Eric Engbretson

A few years ago while taking pictures in Missouri’s sprawling Table Rock Lake, I noticed quite a few flathead catfish around trees and other sunken timber.  What I found unusual was that many of the catfish were not lying on the lake bottom underneath the trees as you might expect.  Instead they were balanced on top of tree branches often several feet above the bottom.  In short-they seemed to be perched in trees the same way you might see squirrels or birds.  One flathead was lying in a tree at least 10 feet off the lake bottom.  I had been looking for catfish around the base of the trees and under sunken timber, but as began looking higher into the water column and “off the bottom” I noticed more catfish in the trees. 
It wouldn’t be accurate to say they were suspended.  They seemed to be inactive and they were resting very still on the higher branches that had a horizontal slant to them.   (See above photo) The channel catfish I also saw around trees were always near the bottom, but I encountered many flathead catfish perched higher in the trees. 

It was an interesting discovery that puzzled me.  Why would these flathead catfish be so far off the bottom in a tree?   Clearly there must be some advantage or benefit that makes sense to the catfish that I wasn’t aware of.  I did a web search looking for flathead catfish in trees and couldn’t find any mention of this specific action.  For the time being, this peculiar behavior remains a mystery.  You can view more pictures of flathead catfish in trees here.